<?xml version="1.0" encoding="utf-8"?><feed xmlns="http://www.w3.org/2005/Atom" ><generator uri="https://jekyllrb.com/" version="4.3.1">Jekyll</generator><link href="https://dougie.io/feed.xml" rel="self" type="application/atom+xml" /><link href="https://dougie.io/" rel="alternate" type="text/html" /><updated>2022-11-05T03:08:24+00:00</updated><id>https://dougie.io/feed.xml</id><title type="html">dougie.io</title><subtitle>Business, Technology, and Practicality. Written by Doug Beney</subtitle><author><name>Doug Beney</name></author><entry><title type="html">eBook Launch Case Study: How Doug Made $3000 in 2 Weeks With an Email List of Just 2,500</title><link href="https://dougie.io/business/ebook-launch/" rel="alternate" type="text/html" title="eBook Launch Case Study: How Doug Made $3000 in 2 Weeks With an Email List of Just 2,500" /><published>2022-08-24T00:00:00+00:00</published><updated>2022-08-24T00:00:00+00:00</updated><id>https://dougie.io/business/ebook-launch</id><content type="html" xml:base="https://dougie.io/business/ebook-launch/"><![CDATA[<p>This post was originally published on <a href="https://www.cloudliving.com/">CloudLiving.com</a>.</p>

<p>In 2016 I launched an eBook all about making MIDI controllers. Since then, I have converted it into <a href="https://diymidicontroller.com/">an online course at DIYMIDIController.com</a>. I don’t do anything with it anymore besides the occasional customer support. Without touching it or promoting it at all anymore, it makes $400-$1,000 per year.</p>

<hr />

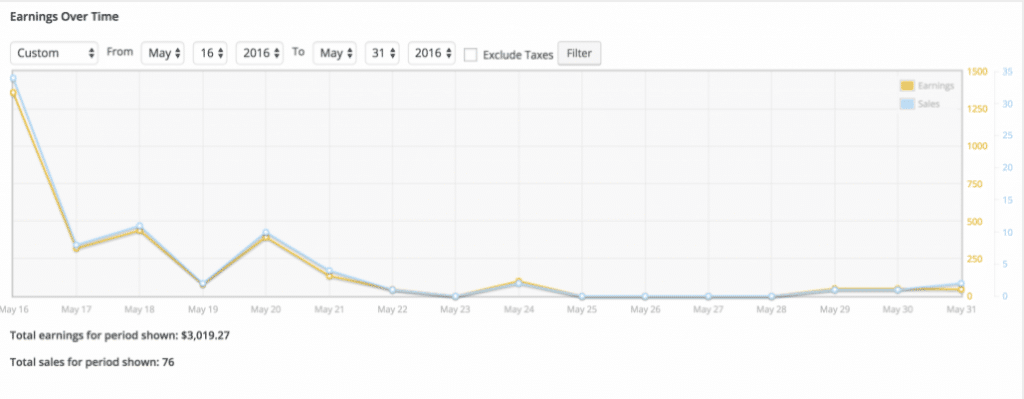
<p><img src="/static/img/blog/ebook-launch/ebooklaunch.png" alt="Launch earnings graph" /></p>

<p>In May of 2016, I launched my very first eBook, The DIY MIDI Controller Bible, to a list of around 2,500.</p>

<p>In the first day of launching, I sold 34 eBooks for $49.99 each, earning $1359.66.</p>

<p>Not a bad achievement if I may say so myself.</p>

<p>This post is my attempt at breaking down everything I learned along the way, from choosing a market, to writing and formatting an eBook, to launching it.</p>

<p>I really hope you get some insane value out of this post. This is the first article of, hopefully, many I will be posting to Cloud Living.</p>

<h3 id="how-to-choose-a-topic">How to Choose a Topic</h3>

<p>Choosing a good, marketable, topic is important, but not as important as market testing.</p>

<p>Many people get stuck on picking a topic. They keep looking for “hot” niches and trends to monetize without even considering the skills they already know.</p>

<p>I want to make it clear that I didn’t spend hours of my time in white boarding sessions trying to formulate the perfect eBook topic.</p>

<p>The strategy I recommend is:</p>

<ul>
  <li>Pick a topic you are interested in. (or already passionate about)</li>
  <li>Do some research to find out how big the market is, what books you are up against, and how hungry your audience is for a solution to their problem</li>
  <li>Market test your topic before even thinking about writing your eBook (more on this later!)</li>
</ul>

<p>The topic I choose was building MIDI controllers. If you weren’t aware MIDI technology has been around since the 80s’. MIDI controllers essentially allow you to send musical notes to your computer to trigger digital pianos, drums, synths and more. You could, of course, buy MIDI controllers, but many musicians prefer to build their own to suit their own personal needs.</p>

<p>Now, this topic is not super huge. It’s not a “hot” niche that everyone wants to go into either. I was skeptical for a while regarding whether the product would even sell. That’s why market testing is the most important step.</p>

<p>The way I found my niche was through my music production blog.</p>

<p>I would write a little tutorial about building MIDI controllers every once and a while. And I noticed a much higher engagement with this sort of content than any other.</p>

<p>Maybe you don’t already have a blog like I did, where you can observe what content performs the best. No worries!</p>

<p>Choosing a topic is all about observing your market desires. You should start with your own passions and interests before anything else.</p>

<p>Remember, picking a topic is not as crucial as market testing. At this point you should create a list of 2–5 topics you think will be profitable. After that, you’re ready to get testing!</p>

<h3 id="how-to-market-test-your-idea-for-free">How to Market Test Your Idea for Free</h3>

<p>I discovered many secrets along the way for market testing ideas.</p>

<p>All of the ideas I’ve seen around the web for market testing are along the lines of “create a Facebook Ad”.</p>

<p>While Facebook Ads will be a crucial component to launching your eBook (I owe A LOT of the success of my book to FB ads), there are some awesome free ways to test a market’s interest that won’t cost you a dime.</p>

<h4 id="reddit---where-plenty-of-your-customers-hang-out">Reddit - Where Plenty of Your Customers Hang Out</h4>

<p>If you don’t already know what Reddit is, it’s a social network filled with niche communities, covering every topic imaginable.</p>

<p>Each community is called a subreddit. There’s even a really useful Subreddit for entrepreneurs, located at <a href="https://www.reddit.com/r/entrepreneur">/r/entrepreneur</a> - It’s filled with an endless amount of case studies and value. You can ask any entrepreneurial question there and get many responses quite fast.</p>

<p>So, why aren’t marketers flocking to Reddit?</p>

<p>Many try, but reddit users have a bullshit detector like you’ve never seen! (There’s even a <a href="https://www.reddit.com/r/hailcorporate">/r/HailCorporate</a> section where big companies are called out for trying to infiltrate reddit!)</p>

<p>Because of this, reddit remains a very authentic place where you can discuss topics you’re interested in without being bombarded by spam. This is very unique in a social network since every other social network I use has endless amounts of spam.</p>

<p>How I Used Reddit As a Market Testing Tool</p>

<p>You might be wondering how I am able to use reddit for business purposes.</p>

<p>The trick? (If you’d even call it that) is to be authentic.</p>

<p><img src="/static/img/blog/ebook-launch/reddit.png" alt="reddit" /></p>

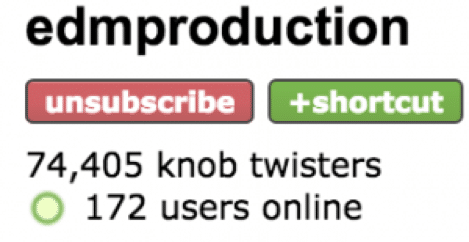
<p>First, you have to find a few subreddits relevant to your niche. One of the subs I used is /r/edmproduction, which has over 74,000 subscribers.</p>

<p>As long as the subreddit you choose has interaction with many posts being created per day, it will work.</p>

<p><a href="https://www.reddit.com/r/edmproduction/comments/3m4a9a/would_you_benefit_from_a_book_on_building_custom/">Here is one of the posts I created.</a></p>

<p>Wait! Before you analyze and try to replicate how I created that post, know this:</p>

<p>When I first created the post, I DIDN’T include any links. The “UPDATE” section wasn’t there.</p>

<p>After creating this post (without any links), I created a few more like it in different subreddits.</p>

<p>A few hours later, I got many, many responses. At this point, I added the update section to each of the posts, with links to my email capture page.</p>

<p>I also made sure to reply to everyone who seemed like they were interested in the book and provided them with a link to my email capture page.</p>

<p>Don’t forget the survey!</p>

<p>Another great strategy I used, which I almost forgot to mention is that I created a survey.</p>

<p>Once a user enters their email on the prelaunch page, they go to the “Thanks for Signing up!” page. There, I had a heading that said “Want to make this book as awesome as possible? Take our quick survey!”</p>

<p>This got me a lot of great responses. It helped me brainstorm chapter ideas but most importantly, it helped me create a product that matches the customers’ desires.</p>

<h4 id="capturing-email-addresses-during-the-market-test">Capturing Email Addresses During the Market Test</h4>

<p>The email capture page was essentially a waiting list so you could notify your subscribers when the book launches.</p>

<p>It was a very, very simple page, pitching my book idea, telling visitors to enter their email to stay updated.</p>

<p>I didn’t do much split-testing honestly because it converted quite well to start with.</p>

<p>The tool I used to create the email capture page was OptimizePress. I’ll talk about this more in the ‘Selling an eBook’ section of this article, but I actually prefer Thrive’s Landing Page builder much better.</p>

<h3 id="the-key-to-a-successful-launch-building-a-list">The Key to a Successful Launch: Building A List</h3>

<p>In the past, I never really understood the saying “the money is in the list”.</p>

<p>I had an email list for my blog, but I didn’t really get any significant profits from it.</p>

<p>After launching an eBook, I finally understood.</p>

<p>When you get to the point where your list is over 1000 subscribers (my prelaunch email list was around 2,500 subs), you can bring some significant traffic to whatever you like within a few clicks.</p>

<p>An email list was the most important tool I had to stay in touch with potential buyers.</p>

<p>If you’re considering launching a book, course, shop, or whatever, an email list is going to be a huge asset.</p>

<p>DON’T finish writing a book and then start promoting your prelaunch. It’s important to start promoting before you even start creating your eBook.</p>

<p><em>Important note:</em> For a prelaunch, I used a single opt-in instead of a double opt-in. This means that you don’t have to confirm your email after signing up for my list. I got hardly any spam email subscribers (if any) and a good open rate. For a prelaunch, a single opt-in will also increase your conversion rate. No need to throw buyers away for not confirming their email!</p>

<p><img src="/static/img/blog/ebook-launch/facebook.png" alt="Facebook conversions" /></p>

<h3 id="a-detailed-look-at-my-facebook-ad-campaign">A Detailed Look at my Facebook Ad Campaign</h3>

<p>My Facebook campaign had incredible conversion rates with a very, very low cost-per-lead.</p>

<p>I didn’t have any prior experience in paid advertising. The only resource I had to learn was Jerry Banfield’s Facebook ads course on Udemy (not affiliated).</p>

<p>The ad campaign I ran lasted from December 14, 2016 to May 9, 2016.</p>

<p>That might seem like a long time. The majority of that time was spent writing the book. For the most part, the ad campaign was set-it-and-forget-it.</p>

<h4 id="daily-spend">Daily spend</h4>

<p>To this day, I still start out every ad campaign at a $5 a day budget.</p>

<p>From my findings, $5 a day allows you to gauge whether your campaign is a hit or miss without spending much money.</p>

<p><img src="/static/img/blog/ebook-launch/facebook2.png" alt="Facebook conversions" /></p>

<h4 id="the-ad">The ad</h4>

<p>As you can see, the ad isn’t anything too crazy, but it’s simple and performed exceptionally.</p>

<p>The ad has a nice graphic and the caption is simple. When they clicked the ad, it would bring them to the prelaunch page where they can enter their email and be on my list.</p>

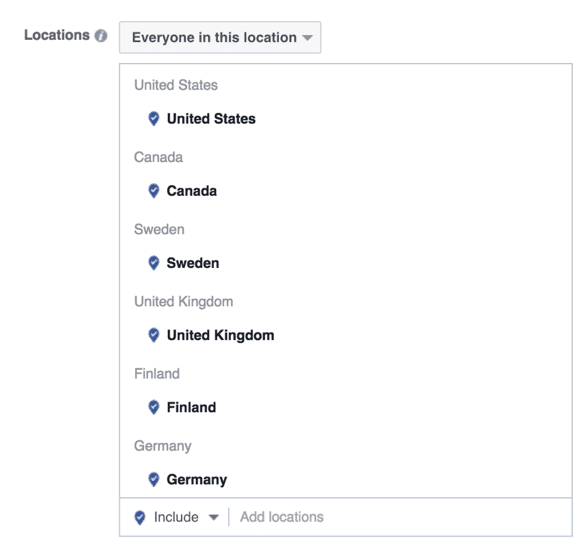
<p>I targeted this ad to these countries:</p>

<p><img src="/static/img/blog/ebook-launch/facebook3.png" alt="Facebook countries" /></p>

<p>(I also made sure the ad only got delivered to English speakers.)</p>

<h4 id="cost-per-lead">Cost per lead</h4>

<p>Maybe it was just my industry, but I got leads for dirt cheap!</p>

<p>When my ad campaign was at $5 a day, I was getting leads for $0.25 a pop! That’s insane compared to what I heard others were getting.</p>

<p>(However, once I scaled up, the cost-per-lead went about to $0.60 a lead. Still really great!)</p>

<h4 id="scaling-up">Scaling up</h4>

<p>After I was getting good results with $5 a day, I doubled my ad spend to $10 a day.</p>

<p>One of the side effects of scaling up a campaign is that your conversions will go down for a few days. Facebook fixes this automatically over time as they make adjustments so you reach the best-converting people.</p>

<p>Even after a few days, my ad spend never really went back to the $0.25 per lead I’ve gotten used to. The highest it went to was around $0.80 per lead, but was at an average of $0.60 a lead.</p>

<h3 id="creating-an-ebook-what-tools-i-used">Creating An eBook: What Tools I Used</h3>

<p>To write the book, I used a Mac app called iBooks Author. It’s completely free and lets you create really awesome looking books.</p>

<p>I don’t believe it is available on Windows or will be anytime soon. You can use something as simple as Microsoft Word.</p>

<p>If you’re an Adobe user, Indesign is another option you can choose. I don’t think it’s very beginner-friendly though.</p>

<p>Lead magnets: Slightly unrelated, but when I create lead magnets (free short eBooks), I use Google Slides to create them. You could probably get away with writing a complete book in Google Slides if you wanted to.</p>

<p>If you decide to go the route of designing your book in Google Slides, I recommend writing the book first in Microsoft Word (or Google Docs) and then transferring the text to the Google Slide (it will make things a bit easier).</p>

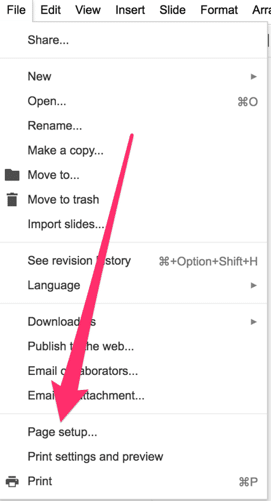
<p><img src="/static/img/blog/ebook-launch/google-docs.png" alt="Google Slides page setup" /></p>

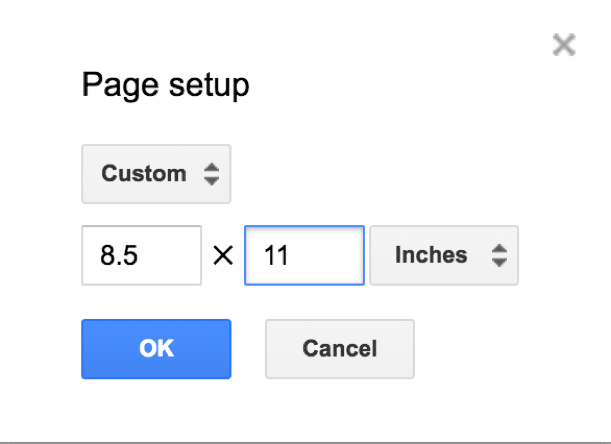
<p>To create an eBook in Google Slides, click File»Page Setup.</p>

<p><img src="/static/img/blog/ebook-launch/google-docs2.png" alt="Google Slides page setup 2" /></p>

<p>Then, change the preset to “Custom” and change the dimensions to 8.5 x 11 inches. Now you can design the eBook quite easily.</p>

<p><img src="/static/img/blog/ebook-launch/google-docs3.png" alt="Google Slides page setup 3" /></p>

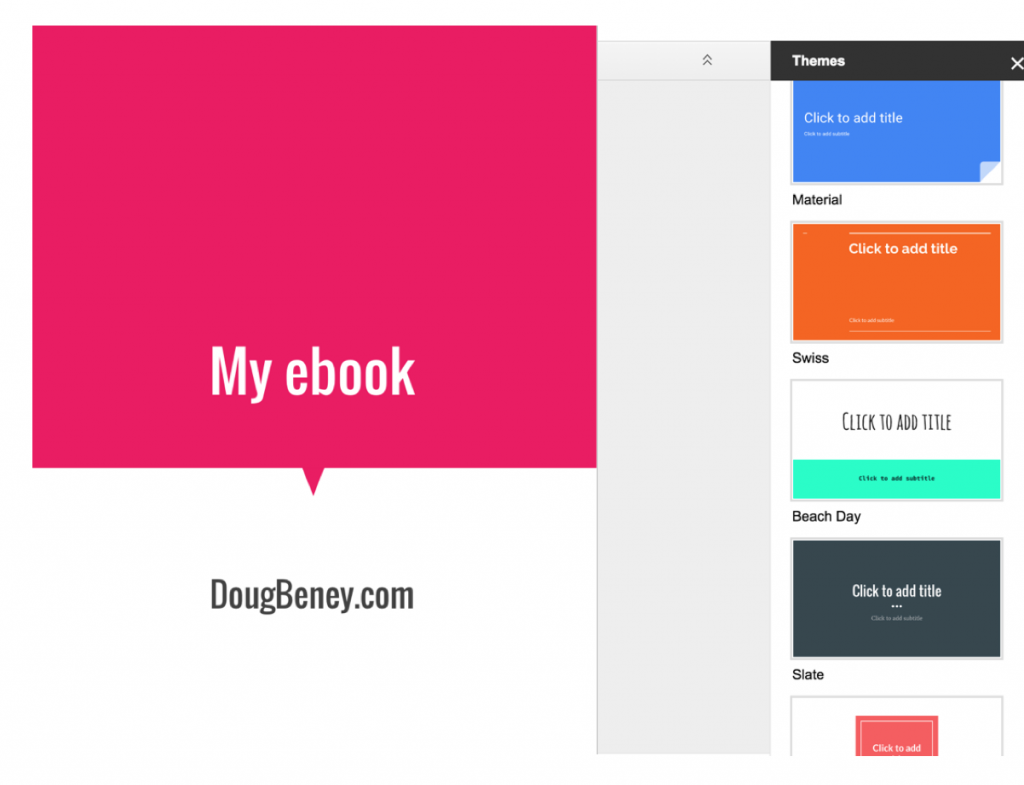
<p>You can also use the themes in the right sidebar to give your book a cleaner design.</p>

<h3 id="selling-an-ebook-what-tools-i-used">Selling An eBook: What Tools I Used</h3>

<p>Keep in mind that you don’t have to use exactly what I do. There are plenty of other options as well that I will go over.</p>

<p>Tools I used to create my website (DIYMIDIController.com)</p>

<ul>
  <li>WordPress (free)</li>
  <li>Asgaros Forum WordPress plugin (free)</li>
  <li>
    <p>Easy Digital Downloads (AKA E.D.D) (free)</p>
  </li>
  <li>E.D.D. MailChimp extension ($29.00)</li>
  <li>E.D.D. Stripe payment gateway extension ($49.99)</li>
  <li>E.D.D. BitPay gateway extension ($49.99)</li>
  <li>
    <p>E.D.D Content Restriction extension ($29.00)</p>
  </li>
  <li>MailChimp (I already pay for this anyway)</li>
  <li>OptimizePress ($97)</li>
  <li>DigitalOcean web hosting (You can use whatever you prefer)</li>
</ul>

<p>So, maybe I went a bit over board with Easy Digital Download extensions.</p>

<p>Looking back, I would’ve probably considered another route instead of E.D.D, but I am not complaining since it was really easy to set up and was a powerful tool.</p>

<p>If you’re simply selling an eBook, I would look into using Gumroad as a platform to sell your product.</p>

<p>The reason I bought all of those extensions is because I wanted to build an intricate system.</p>

<p>Here is how everything works:</p>

<h4 id="optimizepress">OptimizePress</h4>

<p>Optimizepress is an epic theme &amp; plugin that allow you to create landing pages quickly.</p>

<p>Another good option is Thrive Landing Pages (I’ve been using Thrive’s plugins a lot lately).</p>

<h4 id="edd-easy-digital-downloads">E.D.D (Easy Digital Downloads)</h4>

<p>Just as it sounds, Easy Digital Downloads is a free WordPress plugin that will let you sell digital products.</p>

<p>The caveat is that in order to get more payment options and features, you need to buy their paid extensions.</p>

<p>You get a Paypal and ‘Pay with Amazon’ gateway for free in E.D.D.</p>

<h4 id="edd-mailchimp-extension">E.D.D. Mailchimp Extension</h4>

<p>The Mailchimp plugin is very useful for email list segmentation.</p>

<p>I have it set up so that whenever someone purchases a product of mine, they will be segmented on my email list.</p>

<p>This allows me to send emails to people who haven’t bought my book yet without annoying those who already bought it.</p>

<p>It will also help me down the road with new products so I can email to a targeted list of people who have already bought from me in the past.</p>

<h4 id="edd-stripe-payment-gateway-extension">E.D.D. Stripe Payment Gateway Extension</h4>

<p>Stripe is something that was responsible for many sales.</p>

<p>It allows for credit card processing. I did get a lot of Paypal payments, but there was an equal amount of credit card payments.</p>

<h4 id="edd-bitpay-gateway-extension">E.D.D. BitPay Gateway Extension</h4>

<p>Ok…</p>

<p>So this wasn’t completely necessary. I got it only because I’m a fan of Bitcoin.</p>

<p>HOWEVER, I did get 2 sales in Bitcoin, totaling $80 (They were made during a sale). So this plugin did pay for itself!</p>

<h4 id="edd-content-restriction-extension">E.D.D Content Restriction Extension</h4>

<p>I have a member’s community on my website. In order to make sure only people who bought the book have access to it, I use the Content Restriction extension.</p>

<h3 id="how-to-price-your-ebook">How to Price Your eBook</h3>

<p>What really helped me out when learning how to price a product was Corey Ferreira’s video on pricing. He even wrote a whole <a href="https://web.archive.org/web/20170203155933/http://embolden.co/how-to-price-digital-products-using-the-perceived-value-test/">blog post on pricing</a> here.</p>

<p>Essentially, you want to price your product higher then what you think you should price it.</p>

<p>It is harder to raise the price of your product than it is to lower it.</p>

<p>I thought $30 was the most I’d be able to price my eBook. I decided to charge $50 instead and bundle the eBook with a bunch of code files, schematics, and a member’s forum.</p>

<p>When I launched I got no complaints whatsoever and I’ve got plenty of members who have said it was well worth the price.</p>

<p><img src="/static/img/blog/ebook-launch/mailchimp.png" alt="Mailchimp" /></p>

<h3 id="launching-the-ebook-to-your-list">Launching the eBook to Your List</h3>

<p>The launch is the moment of truth.</p>

<p>All of your hard work and market research is tested by the REAL market.</p>

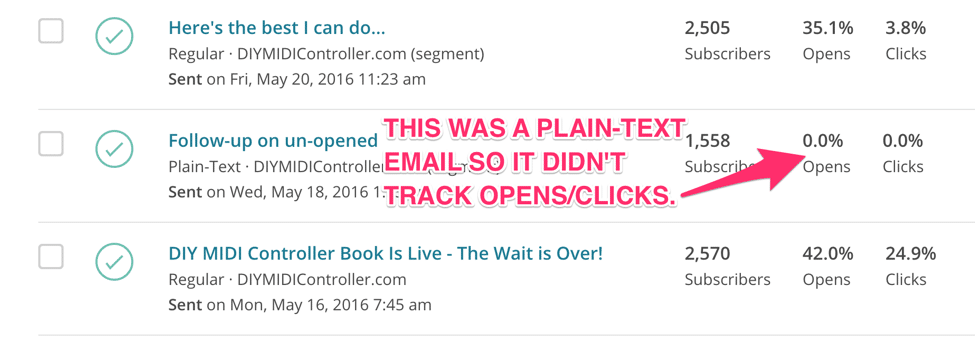
<p>The image above shows the 3 emails I sent out (the first email is at the bottom).</p>

<p>In this section of the article, we will be going over the emails I sent.</p>

<h4 id="email-1">Email #1</h4>

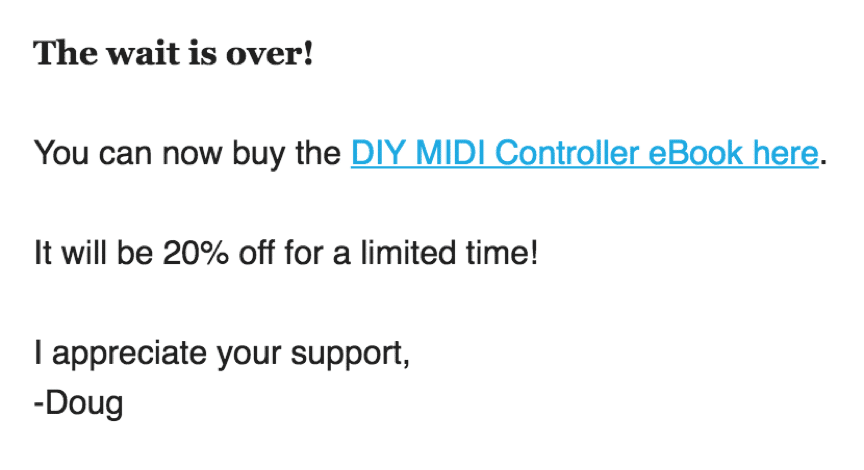
<p>Subject line: DIY MIDI Controller Book Is Live - The Wait Is Over!</p>

<p>Email body:</p>

<p><img src="/static/img/blog/ebook-launch/email.png" alt="Email 1" /></p>

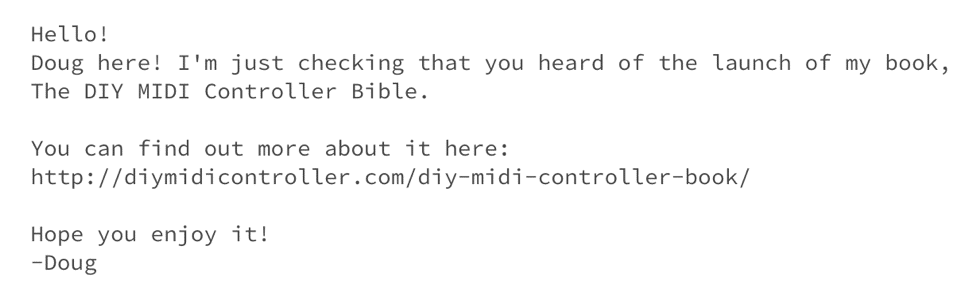
<p>This first email is quick, provides a link to buy the product in the first sentence, and includes a bit of scarcity saying the book is 20% off for a limited time.</p>

<p>Also, I created a countdown timer on the sales page that made it clear that the 20% off sale wasn’t going to last forever.</p>

<h4 id="email-2">Email #2</h4>

<p>Subject Line: Did you receive my last email?</p>

<p>Email body:</p>

<p><img src="/static/img/blog/ebook-launch/email2.png" alt="Email 2" /></p>

<p>I sent this email to people who didn’t open my last email. This drove a lot more sales.</p>

<p>The reason the open rate and click-through rate display 0% is because I was experimenting with plain-text emails to see if they have higher open rates. Little did I know open-rates only display in HTML emails…</p>

<h4 id="email-3">Email #3</h4>

<p>Subject line: Here’s the best I can do…</p>

<p>Email body:</p>

<p><img src="/static/img/blog/ebook-launch/email3.png" alt="Email 3" /></p>

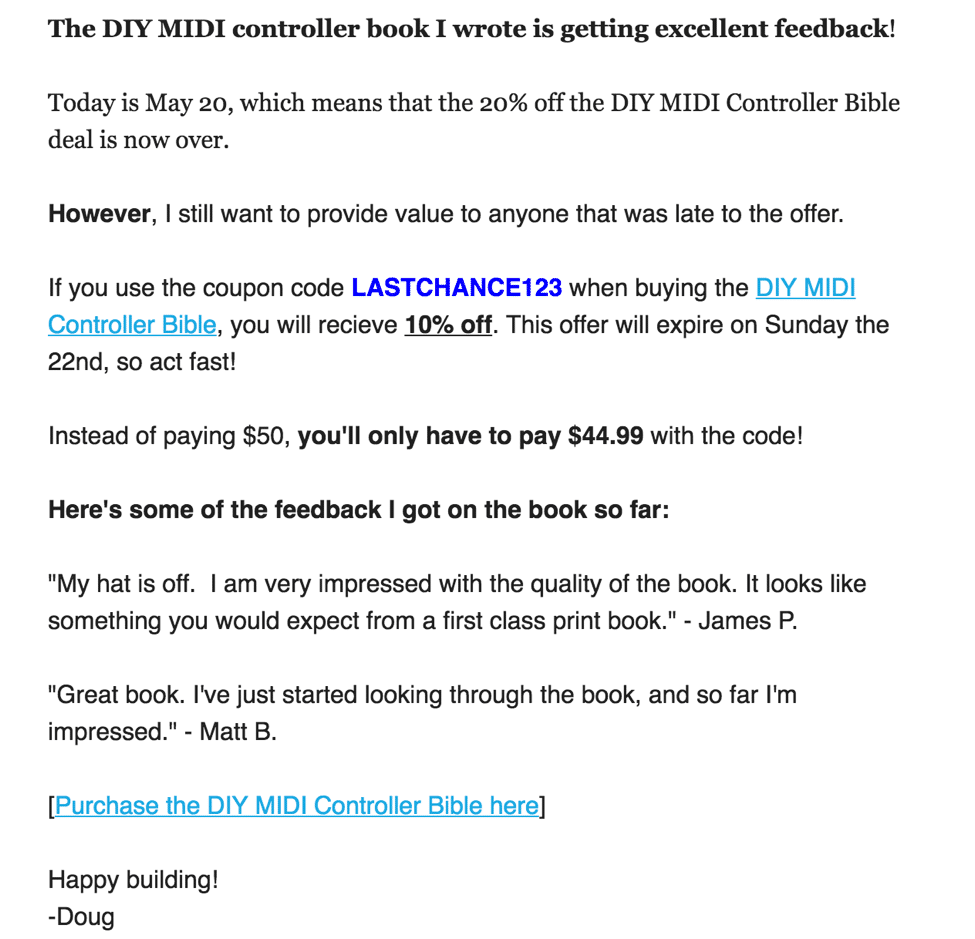
<p>I sent this last email to ONLY people that haven’t purchased my product yet. (Remember I talked about how the Mailchimp E.D.D extension segments buyers?)</p>

<p>This is a slightly lengthier email. It even includes two testimonials I received over email!</p>

<p>Since this was after the 20% off sale, I gave them a coupon code for 10% off so they’d still have a chance to save money on the book.</p>

<h3 id="biggest-lessons-ive-learned">Biggest Lessons I’ve Learned</h3>

<p>Launching this book taught me a lot about marketing and sales.</p>

<p>Here are the biggest lessons I’ve learned along the way:</p>

<h4 id="dont-be-scared-of-risk">Don’t be scared of risk.</h4>

<p>I invested over $1,500 in this launch and many, many hours of work.</p>

<p>This wasn’t a book that I could just bang out and sell. I had to purchase a lot of additional circuitry equipment, create detailed schematics, create plenty of sample code, create plenty of circuits, and photograph them all in a way that makes sense.</p>

<p>Being 17, I have never spent over $1,000 that fast in my life. I run authority sites as well, but at the time, I didn’t have to pour a whole lot of money into them.</p>

<h4 id="taking-action-does-not-mean-rushing-into-things-uneducated">“Taking action” does not mean rushing into things uneducated</h4>

<p>Like I’ve mentioned, market testing was the most important step of this entire process.</p>

<p>Yes, you shouldn’t get hung up on tiny little detailed and avoid taking action, but you also shouldn’t create a full-out product, pouring hours-upon-ours of your time into it, without properly testing your market.</p>

<h4 id="no-matter-what-kind-of-business-you-create-build-an-email-list">No matter what kind of business you create, build an email list!</h4>

<p>Yes, there will always be the next hot social network but for over a decade email has been a line of direct communication that is not going away anytime soon.</p>

<h3 id="conclusion">Conclusion</h3>

<p>I hope you got a lot out of this article!</p>

<p>It was a ton of fun to write!</p>

<p>You might be wondering how I am going to be promoting the eBook since I already launched it.</p>

<p>Well, something I’ve been reading a lot about is launching a product twice. Nathan Barry talks a lot about this.</p>

<p>I am planning on moving my eBook into an online platform hosted on my website. This way I’ll be able to update content easier and can even add video if I want. But most importantly, I’ll be able to launch the product a second time. I think I’ll go about it the same sort of way, building a prelaunch list and launching to them.</p>

<p>Another way I’m promoting it is through the music production blog I run, through banner ads and contextual references.</p>

<p>Feel free to leave a comment down below if you’d be interested in a follow-up article when I do a second launch!</p>]]></content><author><name>Doug Beney</name></author><category term="Business" /><summary type="html"><![CDATA[This post was originally published on CloudLiving.com.]]></summary></entry><entry><title type="html">How to Enqueue CSS and JS in Wordpress Block Themes (and load it only on CERTAIN templates!)</title><link href="https://dougie.io/answers/block-theme-enqueue-css/" rel="alternate" type="text/html" title="How to Enqueue CSS and JS in Wordpress Block Themes (and load it only on CERTAIN templates!)" /><published>2022-06-17T00:00:00+00:00</published><updated>2022-06-17T00:00:00+00:00</updated><id>https://dougie.io/answers/block-theme-enqueue-css</id><content type="html" xml:base="https://dougie.io/answers/block-theme-enqueue-css/"><![CDATA[<p>Block themes are a very promising direction the Wordpress project is taking. I love being able to avoid PHP as much as possible to design websites and with block themes you are essentially using static HTML.</p>

<p>One problem I ran into was enqueing CSS or JS files ONLY on certain templates. While with most websites this is no big deal, but if you are doing something like creating highly optimized landing pages that you want zero unused CSS or JS in, this becomes more important.</p>

<h2 id="how-to-enqueue-css-in-wordpress-block-themes">How To Enqueue CSS in Wordpress Block Themes</h2>

<p>It’s no different than with regular Wordpress themes.</p>

<p>You have to add a snippet of code similar to this in your theme’s <code class="language-plaintext highlighter-rouge">functions.php</code>.</p>

<figure class="highlight"><pre><code class="language-php" data-lang="php"><span class="nf">add_action</span><span class="p">(</span> <span class="s1">'wp_enqueue_scripts'</span><span class="p">,</span> <span class="s1">'mytheme_enqueue'</span> <span class="p">);</span>
<span class="k">function</span> <span class="n">mytheme_enqueue</span><span class="p">()</span> <span class="p">{</span>
	<span class="nf">wp_enqueue_style</span><span class="p">(</span> <span class="s1">'mytheme-main-styles'</span><span class="p">,</span> <span class="nf">get_stylesheet_uri</span><span class="p">()</span> <span class="p">);</span>
	<span class="nf">wp_enqueue_style</span><span class="p">(</span> <span class="s1">'mytheme-other-styles'</span><span class="p">,</span> <span class="nf">get_template_directory_uri</span><span class="p">()</span> <span class="mf">.</span> <span class="s1">'/css/other-styles.css'</span> <span class="p">);</span>
	<span class="nf">wp_enqueue_script</span><span class="p">(</span> <span class="s1">'mytheme-js'</span><span class="p">,</span> <span class="nf">get_template_directory_uri</span><span class="p">()</span> <span class="mf">.</span> <span class="s1">'/js/main.js'</span> <span class="p">);</span>
<span class="p">}</span></code></pre></figure>

<h2 id="how-to-enqueue-css-in-wordpress-block-themes-only-on-specific-template">How To Enqueue CSS in Wordpress Block Themes Only on Specific Template</h2>

<figure class="highlight"><pre><code class="language-php" data-lang="php"><span class="nf">add_action</span><span class="p">(</span> <span class="s1">'wp_enqueue_scripts'</span><span class="p">,</span> <span class="s1">'mytheme_enqueue'</span> <span class="p">);</span>
<span class="k">function</span> <span class="n">mytheme_enqueue</span><span class="p">()</span> <span class="p">{</span>
	<span class="nv">$custom_template</span> <span class="o">=</span> <span class="nf">get_post_meta</span><span class="p">(</span> <span class="nf">get_the_ID</span><span class="p">(),</span> <span class="s1">'_wp_page_template'</span><span class="p">,</span> <span class="kc">true</span> <span class="p">);</span>
	<span class="c1">// Enqueue script if the user is viewing a webpage that is using the 'templates/foo.html' block template.</span>
	<span class="k">if</span> <span class="p">(</span><span class="nv">$custom_template</span> <span class="o">==</span> <span class="s1">'foo'</span><span class="p">)</span> <span class="p">{</span>
		<span class="nf">wp_enqueue_style</span><span class="p">(</span> <span class="s1">'mytheme-other-styles'</span><span class="p">,</span> <span class="nf">get_template_directory_uri</span><span class="p">()</span> <span class="mf">.</span> <span class="s1">'/css/other-styles.css'</span> <span class="p">);</span>
	<span class="p">}</span>
<span class="p">}</span></code></pre></figure>

<h2 id="credit">Credit</h2>

<p>Enqueing a stylesheet/script on a specific template page was one of those problems that stumped me for days. The normal Wordpress template related functions just did not work. Big, big thanks to S. Walsh who answered <a href="https://stackoverflow.com/questions/72579216/how-can-i-enqueue-a-css-file-on-a-specific-wordpress-block-template/72611348#72611348">my StackOverflow question</a>.</p>]]></content><author><name>Doug Beney</name></author><category term="Answers" /><category term="Wordpress" /><summary type="html"><![CDATA[Block themes are a very promising direction the Wordpress project is taking. I love being able to avoid PHP as much as possible to design websites and with block themes you are essentially using static HTML.]]></summary></entry><entry><title type="html">How to Fix the ‘File not found.’ error in Caddy</title><link href="https://dougie.io/linux/caddy-fix-file-not-found/" rel="alternate" type="text/html" title="How to Fix the ‘File not found.’ error in Caddy" /><published>2020-11-29T15:57:00+00:00</published><updated>2020-11-29T15:57:00+00:00</updated><id>https://dougie.io/linux/caddy-fix-file-not-found</id><content type="html" xml:base="https://dougie.io/linux/caddy-fix-file-not-found/"><![CDATA[<p><a href="https://caddyserver.com/">Caddy</a> server is INCREDIBLY awesome. My main use for it as of late is as a development environment. PHP (wordpress) development environments are a pain to set up and this makes my job so much easier. I don’t need any sort of containers or virtual machines to get up a nice and reliable environment. And it’s configuration is dead easy. You can have a working Wordpress site in a few lines of code.</p>

<p>Anyhow, I have two separate Arch Linux computers, nearly identical. My Caddy project worked just fine on one computer. On the other, I kept getting the “File not found.” message in the browser.</p>

<h2 id="the-solution">The Solution!</h2>

<p>It turns out that this was a <code class="language-plaintext highlighter-rouge">php-fpm</code> problem. The “user” that the php-fpm runs under does not have permission to view files in your project directory. There are two solutions.</p>

<p>You have to find your <a href="https://stackoverflow.com/questions/39054500/what-is-www-conf">www.conf</a>. It will vary from distro to distro. Mine was at <code class="language-plaintext highlighter-rouge">/etc/php/php-fpm.d/www.conf</code>.</p>

<p>In it, you’ll find a section that looks like this:</p>

<div class="language-plaintext highlighter-rouge"><div class="highlight"><pre class="highlight"><code>; Unix user/group of processes
; Note: The user is mandatory. If the group is not set, the default user's group
;       will be used.
user = http
group = http
</code></pre></div></div>

<p>As you can see, the user and group of the php-fpm process is <code class="language-plaintext highlighter-rouge">http</code>.</p>

<p>You can also confirm this by running <code class="language-plaintext highlighter-rouge">ps u | grep php-fpm</code>. This returned four lines and two of them were as follows:</p>

<div class="language-bash highlighter-rouge"><div class="highlight"><pre class="highlight"><code>http       17244  0.0  0.1  85284  9372 ?        S    16:11   0:00 php-fpm: pool www
http       17245  0.0  0.1  85284  9372 ?        S    16:11   0:00 php-fpm: pool www
</code></pre></div></div>

<p>The first word of each line is the user that owns the process. As you can see it’s <code class="language-plaintext highlighter-rouge">http</code> as expected.</p>

<h3 id="solution-1-lazy-and-not-recommended">Solution #1: Lazy and not recommended</h3>

<p>The first idea I had (which worked) was to change the user of the process in <code class="language-plaintext highlighter-rouge">www.conf</code> to my own user of the computer.</p>

<p>This idea got dumber and dumber the more I thought about it. This means any PHP code I execute has full read and write permission on all of my most important files. For that reason, go to Solution #2.</p>

<h3 id="solution-2-read--and-optionally-write-permissions">Solution #2: Read  (and optionally, write) Permissions</h3>

<p>So, now we know that <code class="language-plaintext highlighter-rouge">php-fpm</code> is running as the user <code class="language-plaintext highlighter-rouge">http</code> and the group <code class="language-plaintext highlighter-rouge">http</code>.</p>

<p>If all you want is read permissions and you don’t care about providing ownership to the php-fpm process, you just need read privileges on your project directory and execution privileges on your parent directories.</p>

<p>For example, I had this project directory: <code class="language-plaintext highlighter-rouge">/home/doug/Code/Wordpress/my_project</code>.</p>

<p>I first had to <strong>make sure</strong> ‘other’ execution privilege was enabled for the directories <code class="language-plaintext highlighter-rouge">/home/</code>, <code class="language-plaintext highlighter-rouge">/home/doug</code>, <code class="language-plaintext highlighter-rouge">/home/doug/Code</code>, and <code class="language-plaintext highlighter-rouge">/home/doug/Code/Wordpress</code>. See <a href="https://superuser.com/questions/163070/user-write-in-a-subfolder-when-cant-access-parent">this answer</a> for an explanation.</p>

<p>You can add ‘other’ execution privilege with the command <code class="language-plaintext highlighter-rouge">chmod o+x {directory}</code>. I wouldn’t recommend using chmod’s <code class="language-plaintext highlighter-rouge">-r</code> (recursive) flag for this.</p>

<p>Now, you just need read privilege on your project directory. Optionally ‘other’ executive privilege on directories if it is not enabled by default.</p>

<p>Run: <code class="language-plaintext highlighter-rouge">chmod -r o+r {directory}</code></p>

<p>If you want <strong>write privileges</strong>, you should provide ownership of the folder to the group or user and provide group or user write permissions to that directory.</p>

<p>Example:</p>

<div class="language-bash highlighter-rouge"><div class="highlight"><pre class="highlight"><code><span class="nb">chmod</span> <span class="nt">-R</span> g+w <span class="o">{</span>project directory<span class="o">}</span>  <span class="c"># Allows users in the directory's group to write</span>
<span class="nb">chown</span> <span class="nt">-R</span> :http <span class="o">{</span>project directory<span class="o">}</span> <span class="c"># Provides ownership of the directory to the 'http' group.</span>
</code></pre></div></div>]]></content><author><name>Doug Beney</name></author><category term="Linux" /><summary type="html"><![CDATA[Caddy server is INCREDIBLY awesome. My main use for it as of late is as a development environment. PHP (wordpress) development environments are a pain to set up and this makes my job so much easier. I don’t need any sort of containers or virtual machines to get up a nice and reliable environment. And it’s configuration is dead easy. You can have a working Wordpress site in a few lines of code.]]></summary></entry><entry><title type="html">How to Use a Trezor Cryptocurrency Wallet On Solus</title><link href="https://dougie.io/cryptocurrency/trezor-solus/" rel="alternate" type="text/html" title="How to Use a Trezor Cryptocurrency Wallet On Solus" /><published>2020-05-23T17:57:00+00:00</published><updated>2020-05-23T17:57:00+00:00</updated><id>https://dougie.io/cryptocurrency/trezor-solus</id><content type="html" xml:base="https://dougie.io/cryptocurrency/trezor-solus/"><![CDATA[<p>Getting a Trezor bitcoin wallet to work with Solus is actually quite easy.</p>

<p>First, you’re going to need to install Solus’s version of <code class="language-plaintext highlighter-rouge">rpm</code>. (It’s a package installer.)</p>

<h2 id="1-install-rpm">1.) Install RPM</h2>

<div class="language-plaintext highlighter-rouge"><div class="highlight"><pre class="highlight"><code>sudo eopkg it rpm
</code></pre></div></div>

<h2 id="2-download-the-trezor-bridge">2.) Download the Trezor Bridge</h2>

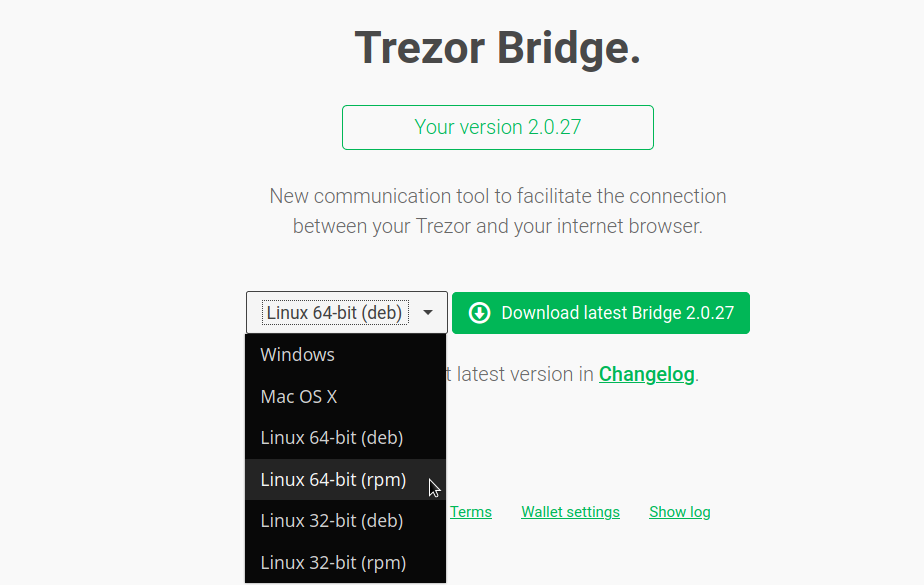
<p><img src="/static/img/blog/solus-trezor/trezor-bridge.png" alt="Trezor Bridge Install" /></p>

<p>The next step is to download the Trezor Bridge by visiting this URL:</p>

<p><a href="https://wallet.trezor.io/#/bridge">https://wallet.trezor.io/#/bridge</a></p>

<p><strong>Bookmark</strong> this URL as you can use it in the future to check if you have the latest version!</p>

<h2 id="3-install-the-trezor-bridge">3.) Install the Trezor Bridge</h2>

<div class="language-plaintext highlighter-rouge"><div class="highlight"><pre class="highlight"><code>sudo rpm -i trezor-bridge-*.*.**-*.x86_64.rpm --nodeps
</code></pre></div></div>

<p>Congrats! After running that command, you should be all set. :)</p>

<p>To confirm that nothing went wrong, type the command <code class="language-plaintext highlighter-rouge">systemctl status trezord</code> and ensure there are no strange errors.</p>

<p>My output looked like this:</p>

<div class="language-plaintext highlighter-rouge"><div class="highlight"><pre class="highlight"><code>● trezord.service - Trezor Bridge
     Loaded: loaded (/usr/lib/systemd/system/trezord.service; enabled; vendor p&gt;
     Active: active (running) since Sat 2020-05-23 17:54:28 EDT; 14min ago
   Main PID: 21995 (trezord)
      Tasks: 15 (limit: 28605)
     Memory: 41.7M
     CGroup: /system.slice/trezord.service
             └─21995 /usr/bin/trezord
lines 1-8/8 (END)
</code></pre></div></div>

<p>Hope you found this useful! Leave a comment if you ran into any problems.</p>

<p>Did this help you out? Feel free to send a tip:</p>

<p><strong>BTC</strong>: 3BZM1eMEm4pDu9NrxAG1oduVfZpf3HCLTL</p>]]></content><author><name>Doug Beney</name></author><category term="cryptocurrency" /><summary type="html"><![CDATA[Getting a Trezor bitcoin wallet to work with Solus is actually quite easy.]]></summary></entry><entry><title type="html">On Spotify Forming Exclusive Deals With Podcasts – Joe Rogan, Last Podcast On The Left, more?</title><link href="https://dougie.io/decentralization/podcast-exclusivity/" rel="alternate" type="text/html" title="On Spotify Forming Exclusive Deals With Podcasts – Joe Rogan, Last Podcast On The Left, more?" /><published>2020-05-20T12:59:00+00:00</published><updated>2020-05-20T12:59:00+00:00</updated><id>https://dougie.io/decentralization/podcast-exclusivity</id><content type="html" xml:base="https://dougie.io/decentralization/podcast-exclusivity/"><![CDATA[<p>Podcasting is a great concept. You can distribute your podcast on multiple platforms and provide one or more RSS feeds. With these RSS feeds you can use any number of podcasting apps. There is very healthy competition amongst these apps. So much so that there is always room for a new app that serves a particular niche of podcast listeners better. I have purchased and donated to many of these apps over the years, supporting both solo developers and small teams that have no goal other than to improve the way you listen to and discover podcasts.</p>

<p>In a world of machine-learning social feed algorithms and a cloud of questionable staff-picked content, RSS puts you in control of seeing what you want to see. Raw and unfiltered. Sorted by most recent to oldest. Nothing is hidden. Not one company is—or should be—in control of what app you use or which feeds you can add.</p>

<p>Companies trying to become “the” podcasting app is not new. See Stitcher, a mostly failed app that nobody enjoys using but managed to gain promotion from most podcasts. They have a noble goal of helping podcasters earn more, poisoned by the idea of centralization. They never had the kind of dough to pen the kinds of deals that Spotify is currently making. <em>They would if they could.</em> Additionally, see Google’s own ‘Podcasts’ app. They haven’t done anything too nefarious so far other than making the discoverability of non-mainstream podcasts difficult.</p>

<p>It is unlikely that these exclusives will slow down. We may even see other large companies follow suit. Spotify has decided that forming multi-million dollar deals is a more effective strategy than creating an app that provides better features to the podcast listener.</p>

<p>When a JRE listener visits Spotify, they will think “Hey, since I’m already here to listen to Joe, I might as well switch over and subscribe to my other podcasts here”. This is how they will gain market share.</p>

<p>Perhaps, if Spotify became the ‘place’ for podcasts, where most listeners are attracted to it because their favorite creators are there exclusively , this would encourage more creators, specifically new creators, to start their podcasts there (and only post there) for the benefit of a large user-base, a hands-free ad system (similar to YouTube’s Adsense) and ease of uploading.</p>

<p>This could have long-term consequences. See how most YouTube creators publish exclusively to YouTube. This has led to massive content discoverability issues as we all rely on the YouTube search and recommendation algorithm to find new videos and channels. Specifically in politics, all independent and small to medium sized media sources on every side of the political spectrum have been pushed back unfairly in favor of massive news organizations that you may or may not have trust in.</p>]]></content><author><name>Doug Beney</name></author><category term="decentralization" /><summary type="html"><![CDATA[Podcasting is a great concept. You can distribute your podcast on multiple platforms and provide one or more RSS feeds. With these RSS feeds you can use any number of podcasting apps. There is very healthy competition amongst these apps. So much so that there is always room for a new app that serves a particular niche of podcast listeners better. I have purchased and donated to many of these apps over the years, supporting both solo developers and small teams that have no goal other than to improve the way you listen to and discover podcasts.]]></summary></entry><entry><title type="html">How to Install the Private Internet Access App On Solus</title><link href="https://dougie.io/linux/pia-solus/" rel="alternate" type="text/html" title="How to Install the Private Internet Access App On Solus" /><published>2020-05-08T23:40:00+00:00</published><updated>2020-05-08T23:40:00+00:00</updated><id>https://dougie.io/linux/pia-solus</id><content type="html" xml:base="https://dougie.io/linux/pia-solus/"><![CDATA[<h3 id="1">1</h3>

<p>Step one is to head on over to the <a href="https://www.privateinternetaccess.com/pages/download">Private Internet Access download page</a>.</p>

<p>That’ll give you a <code class="language-plaintext highlighter-rouge">.run</code> file. Save it to your ~/Downloads directory.</p>

<h3 id="2">2</h3>

<p>Open up a terminal, cd to your Downloads directory, and make the <code class="language-plaintext highlighter-rouge">.run</code> file executable.</p>

<div class="language-bash highlighter-rouge"><div class="highlight"><pre class="highlight"><code><span class="nb">chmod</span> +x pia-linux-<span class="k">*</span>.<span class="k">*</span>.<span class="k">*</span>-<span class="k">*</span>.run
</code></pre></div></div>

<h3 id="3">3</h3>

<p>Before running the installer, we are going to create two symbolic links so the PIA installer does not complain. Solus is structured a bit differently than most other Linux distributions.</p>

<div class="language-bash highlighter-rouge"><div class="highlight"><pre class="highlight"><code><span class="nb">sudo mkdir</span> <span class="nt">-p</span> /usr/local
<span class="nb">sudo ln</span> <span class="nt">-s</span> /usr/bin /usr/local/bin
<span class="nb">sudo ln</span> <span class="nt">-s</span> /usr/share/defaults/iproute2/ /etc/iproute2
</code></pre></div></div>

<h3 id="4">4</h3>

<p>Run the file in your terminal and follow through the install instructions. Should go smoothly without errors.</p>

<div class="language-bash highlighter-rouge"><div class="highlight"><pre class="highlight"><code>./pia-linux-<span class="k">*</span>.<span class="k">*</span>.<span class="k">*</span>-<span class="k">*</span>.run
</code></pre></div></div>

<h3 id="5">5</h3>

<p>Here’s the tricky part that took me hours to figure out.</p>

<p>First, Private Internet Access currently relies on net-tools (primarily netstat. Also ifconfig (which is installed on Solus) and route). Now, the problem here is that net-tools is a deprecated set of utilities and Solus, being ahead of the curve, removed it from their repositories early. No worries, we can still install it.</p>

<p>First, install some utilities.</p>

<div class="language-bash highlighter-rouge"><div class="highlight"><pre class="highlight"><code><span class="nb">sudo </span>eopkg it <span class="nt">-c</span> system.devel
<span class="nb">sudo </span>eopkg it git
</code></pre></div></div>

<p>Now we will install net tools. I recommend running each line one at a time.</p>

<div class="language-bash highlighter-rouge"><div class="highlight"><pre class="highlight"><code><span class="nb">cd</span> /opt
<span class="nb">sudo </span>git clone https://github.com/ecki/net-tools.git
<span class="nb">cd </span>net-tools
<span class="nb">sudo </span>make <span class="c"># Press enter a bunch of times when asked the questions</span>
</code></pre></div></div>

<p>Almost there! Now we will install only the needed utilities through symbolic links</p>

<h3 id="6">6</h3>

<p>The final step is to create two more symlinks.</p>

<div class="language-bash highlighter-rouge"><div class="highlight"><pre class="highlight"><code><span class="nb">sudo ln</span> <span class="nt">-s</span> <span class="nv">$PWD</span>/route /sbin/
<span class="nb">sudo ln</span> <span class="nt">-s</span> <span class="nv">$PWD</span>/netstat /sbin/
<span class="c"># Solus already comes with ifconfig, but it functions a little differently than the ifconfig version we need</span>
<span class="nb">sudo ln</span> <span class="nt">-s</span> <span class="nv">$PWD</span>/ifconfig /sbin/
</code></pre></div></div>

<p>You should be able to connect to the PIA VPN with ease now. Enjoy!</p>

<p>Note that all of the complex stuff we did <strong>only has to be done once</strong>. Private Internet Access will update itself. Well, you have to click a button to update but it will let you know.</p>]]></content><author><name>Doug Beney</name></author><category term="linux" /><summary type="html"><![CDATA[1]]></summary></entry><entry><title type="html">The Perfect Desktop Linux Distribution</title><link href="https://dougie.io/linux/perfect-linux-distro-md/" rel="alternate" type="text/html" title="The Perfect Desktop Linux Distribution" /><published>2020-03-05T17:15:00+00:00</published><updated>2020-03-05T17:15:00+00:00</updated><id>https://dougie.io/linux/perfect-linux-distro-md</id><content type="html" xml:base="https://dougie.io/linux/perfect-linux-distro-md/"><![CDATA[<h3 id="update">Update</h3>

<p>Yeah, so a distro-hopper never settles. The logic is still strong in this post, however I’m still back and fourth on the idea of a point release like Ubuntu vs. rolling release. I’m currently using <a href="https://getsol.us">Solus</a>.</p>

<hr />

<p>The three most important principals for a desktop Linux distribution in my opinion:</p>

<ul>
  <li>Have a stable base (kernel, system libraries, etc)</li>
  <li>Have an up-to-date desktop environment</li>
  <li>Have up-to-date apps</li>
</ul>

<p>Other than those three principals, it’s also important that it…</p>

<ul>
  <li>Doesn’t get in your way. OpenSUSE is a big offender in this matter because of YaST. Other offenders could be things like strange SELinux policies that throw you off, a package manager that’s very slow to use (Fedora’s DNF gave me this problem), and awkward defaults.</li>
  <li>Has all the software you ever need. Ubuntu and Arch are the best at this. Thanks to PPAs and the AUR.</li>
  <li>Makes it easy to upgrade from major version to major version of the distro (For some, you have to re-install the complete distro to upgrade.)</li>
  <li>If it’s a beginner-friendly Linux distribution, it’d be nice if some safe firewall rules are put in place. Perhaps this contradicts my “doesn’t get in your way” idea, but I believe a desktop distribution shouldn’t allow incoming network requests by default. This is not a super import principal to me bear in mind.</li>
</ul>

<hr />

<p>For these reasons, I now believe Ubuntu (more specifically Kubuntu) is the Linux distribution that meets my needs. I’d probably go with Linux Mint or Elementary (both Ubuntu based) if I wasn’t so sold on the KDE desktop environment.</p>

<ul>
  <li>It has a stable base</li>
  <li>Can get the latest version of KDE through the <a href="https://launchpad.net/~kubuntu-ppa/+archive/ubuntu/backports">Kubuntu Backports PPA</a></li>
  <li>Through the default Ubuntu software repository, PPAs, Flatpaks, Snaps, and DEBs that certain companies distribute, you’ll pretty much always be able to get the software you need. Flatpaks, Snaps, and PPAs tend to all be bleeding edge, up-to-date software.</li>
</ul>

<p>Perfect.</p>]]></content><author><name>Doug Beney</name></author><category term="linux" /><summary type="html"><![CDATA[Update]]></summary></entry><entry><title type="html">How to Make Bundler Install Gems In Your Home Folder (Instead of In Your Root/System Directories)</title><link href="https://dougie.io/answers/bundler-no-root/" rel="alternate" type="text/html" title="How to Make Bundler Install Gems In Your Home Folder (Instead of In Your Root/System Directories)" /><published>2020-02-05T00:00:00+00:00</published><updated>2020-02-05T00:00:00+00:00</updated><id>https://dougie.io/answers/bundler-no-root</id><content type="html" xml:base="https://dougie.io/answers/bundler-no-root/"><![CDATA[<p>Tired of Bundler prompting you for your root password when running <code class="language-plaintext highlighter-rouge">bundle install</code>?</p>

<p>This one-line command will permanently solve your woes.</p>

<div class="language-plaintext highlighter-rouge"><div class="highlight"><pre class="highlight"><code>bundle config --global path ~/.bundle-packages
</code></pre></div></div>

<p>And that’s it! You will not be prompted for your root password any more.</p>

<p>If you prefer to set a different install path on a project-by-project basis, you could pass the <code class="language-plaintext highlighter-rouge">--path</code> argument to bundler.</p>

<p>ex.</p>

<div class="language-plaintext highlighter-rouge"><div class="highlight"><pre class="highlight"><code>bundle install --path .bundler
</code></pre></div></div>]]></content><author><name>Doug Beney</name></author><category term="Answers" /><category term="Ruby" /><category term="Jekyll" /><summary type="html"><![CDATA[Tired of Bundler prompting you for your root password when running bundle install?]]></summary></entry><entry><title type="html">How to Update All of Your Python Packages With pip Using One Simple Command</title><link href="https://dougie.io/answers/pip-update-all-packages/" rel="alternate" type="text/html" title="How to Update All of Your Python Packages With pip Using One Simple Command" /><published>2020-02-05T00:00:00+00:00</published><updated>2020-02-05T00:00:00+00:00</updated><id>https://dougie.io/answers/pip-update-all-packages</id><content type="html" xml:base="https://dougie.io/answers/pip-update-all-packages/"><![CDATA[<p><strong>Don’t want to read and just want the solution?</strong> <a href="#tldr-copy-and-paste-solution">Click here to jump to the solution</a></p>

<p>pip doesn’t have a built-in command to update all of its packages. This is likely because it is recommended to have a <a href="https://virtualenv.pypa.io/en/latest/">virtualenv</a> for each new project you create.</p>

<p>In that sort of workflow, you would be guaranteed the latest, most up-to-date packages whenever you start a project. If you’d want to upgrade those packages, you’d keep a requirements.txt file that documents all of your needed packages and you could upgrade using that.</p>

<p><strong>However…</strong></p>

<p>There is an increasing amount of software and command-line utilities that are built with Python.</p>

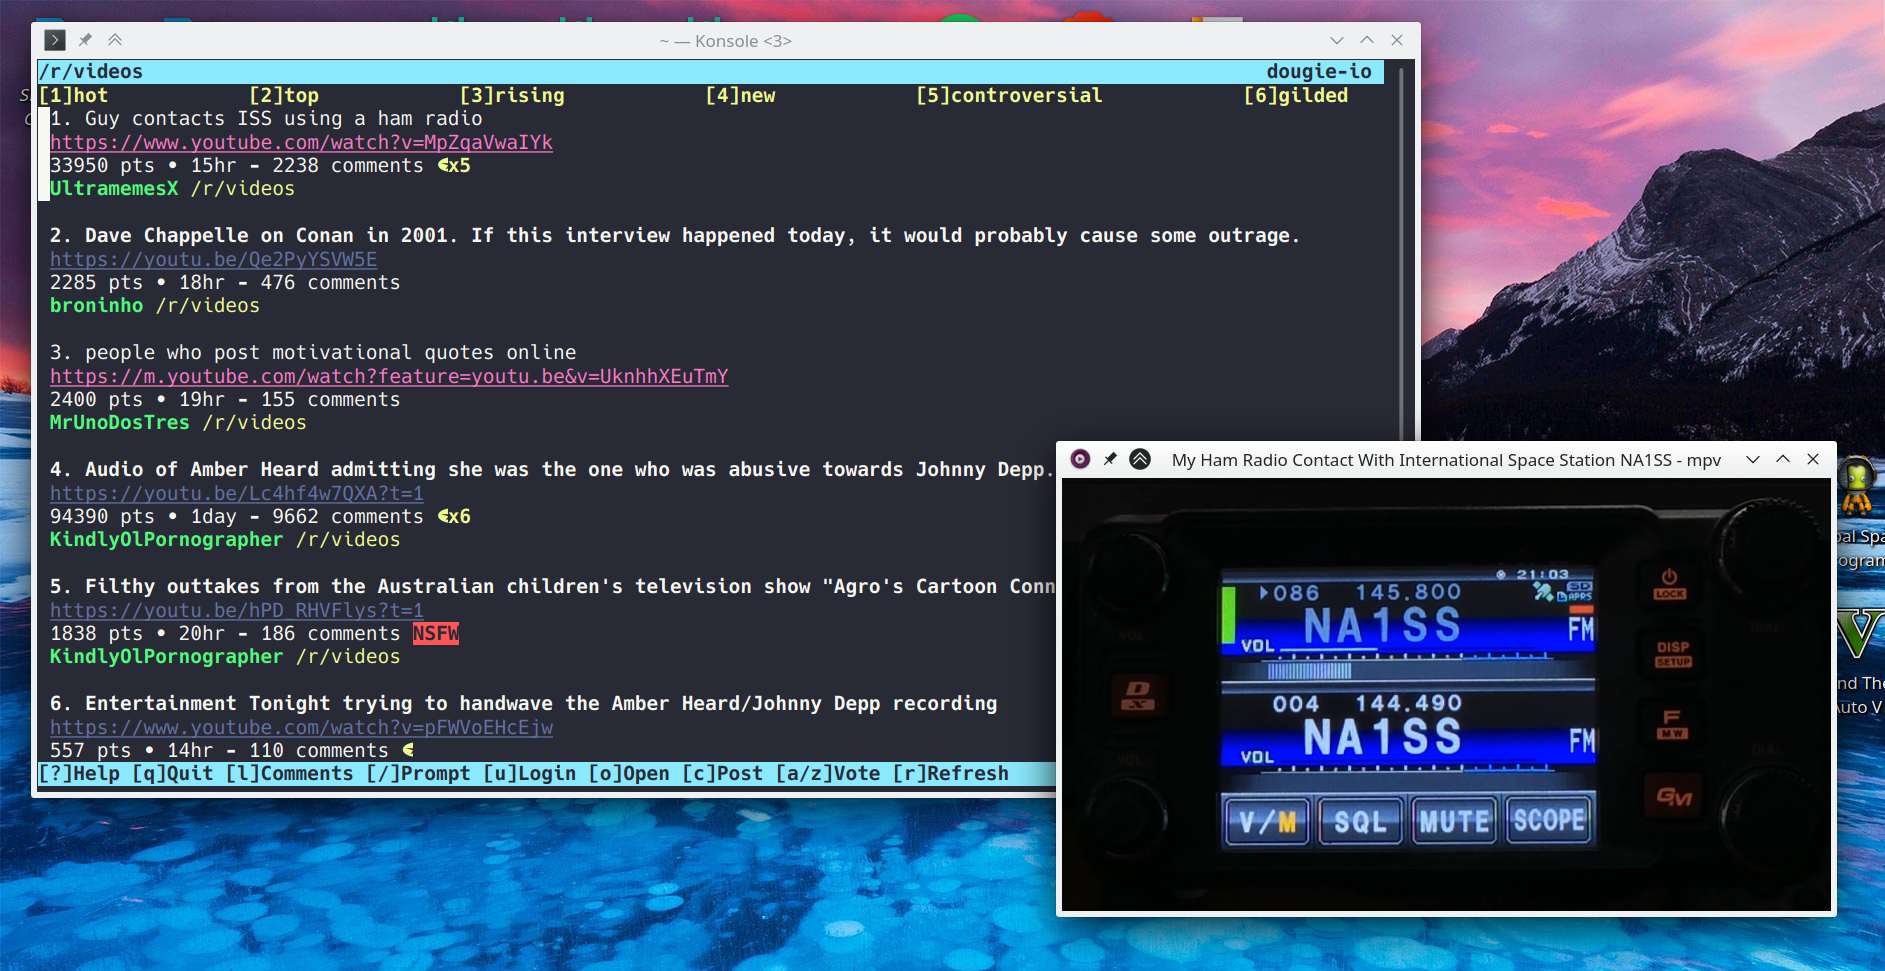
<p>One of my favorites is <a href="https://github.com/michael-lazar/rtv">rtv</a>, a client for the terminal that allows you to read reddit.</p>

<p><img src="/static/img/blog/pip-upgrade-all/rtv.png" alt="rtv, a Python-based terminal app" /></p>

<h2 id="how-to-update-all-pip-packages">How to Update All pip Packages</h2>

<h3 id="before-you-proceed-be-safe">Before you proceed: Be safe</h3>

<p>First of all, <strong>never install Python packages as root using a command like <code class="language-plaintext highlighter-rouge">sudo pip install</code></strong>.</p>

<p>If you type <code class="language-plaintext highlighter-rouge">sudo</code> before <code class="language-plaintext highlighter-rouge">pip install</code>, you are doing things wrong.</p>

<p>Switch to a setup where <code class="language-plaintext highlighter-rouge">pip install</code> installs your packages into your home directory. Mine installs to <code class="language-plaintext highlighter-rouge">~/.local/lib/python3.7/site-packages</code>.</p>

<p>If you were to update system packages using pip, that would cause big problems because some Python packages are installed by your system. Any changes pip makes will be overwritten during an operating system update.</p>

<h3 id="the-command">The Command</h3>

<div class="language-plaintext highlighter-rouge"><div class="highlight"><pre class="highlight"><code>pip freeze --user | cut -d'=' -f1 | xargs -n1 pip install -U
</code></pre></div></div>

<p>If you’re not too familiar with the command-line, that command might look a bit scary to you.</p>

<p>It’s actually not that complex. Here is have it does:</p>

<p><strong>1.</strong> Get a list of user-installed Python packages using <code class="language-plaintext highlighter-rouge">pip freeze --user</code>. (Feel free to try out that command on your own to see what it does)</p>

<p><strong>2.</strong> Using <code class="language-plaintext highlighter-rouge">cut</code>, we cut off the unnecessary info from that command so we are left with just a list of package names.</p>

<p>For example, it would convert this output of <code class="language-plaintext highlighter-rouge">pip freeze --user</code>…</p>

<div class="language-plaintext highlighter-rouge"><div class="highlight"><pre class="highlight"><code>mypackage==1.0.0
mypackage2==1.0.0
</code></pre></div></div>

<p>…to this!</p>

<div class="language-plaintext highlighter-rouge"><div class="highlight"><pre class="highlight"><code>mypackage
mypackage2
</code></pre></div></div>

<p>Simple enough.</p>

<p>And finally, we feed all of those packages to the command <code class="language-plaintext highlighter-rouge">pip install -U</code> using xargs.</p>

<p>We add the flag <code class="language-plaintext highlighter-rouge">-n1</code> to xargs meaning that it will run <code class="language-plaintext highlighter-rouge">pip install -U </code> for each individual package rather than jumbling together all packages.</p>

<p>The reason we do this is so that an error upgrading one package does not halt the entire upgrade process. If you do not like this behavior, you may remove the <code class="language-plaintext highlighter-rouge">-n1</code> flag.</p>

<p>So…instead of this:</p>

<div class="language-plaintext highlighter-rouge"><div class="highlight"><pre class="highlight"><code>pip install -U package1 package2
</code></pre></div></div>

<p>…These commands will run:</p>

<div class="language-plaintext highlighter-rouge"><div class="highlight"><pre class="highlight"><code>pip install -U package1
pip install -U package2
</code></pre></div></div>

<h3 id="saving-your-fingers-using-an-alias">Saving your fingers using an alias</h3>

<p>The command I mentioned is not fun to type if you want to update your packages often.</p>

<p>We can solve this with an alias. Watch <a href="https://www.youtube.com/watch?v=CUePYTZuJ1E">this tutorial</a> for a good overview of aliases if you’re new to it.</p>

<p><strong>The Alias:</strong></p>

<div class="language-plaintext highlighter-rouge"><div class="highlight"><pre class="highlight"><code>alias pip-upgrade="pip freeze --user | cut -d'=' -f1 | xargs -n1 pip install -U"
</code></pre></div></div>

<p>Now all you have to do is type <code class="language-plaintext highlighter-rouge">pip-upgrade</code> whenever you want to update your packages!</p>

<p>This alias works with all major shells including <strong>bash</strong>, <strong>zsh</strong>, and (my favorite) <strong>fish</strong>.</p>

<h2 id="quirk-this-will-not-work-inside-a-virtual-environment-unless">Quirk: This will not work inside a virtual environment unless…</h2>

<p>You’d have to remove the <code class="language-plaintext highlighter-rouge">--user</code> part from <code class="language-plaintext highlighter-rouge">pip freeze --user</code>.</p>

<p>I wouldn’t recommend removing <code class="language-plaintext highlighter-rouge">--user</code> when upgrading packages outside of a virtual environment. Inside a virtual environment, it is perfectly fine.</p>

<h2 id="tldr-copy-and-paste-solution">tl;dr Copy-and-Paste Solution</h2>

<p>Add these two aliases to your shell’s config file (bashrc, zshrc, config.fish, etc).</p>

<div class="language-plaintext highlighter-rouge"><div class="highlight"><pre class="highlight"><code>alias pip-upgrade="pip freeze --user | cut -d'=' -f1 | xargs -n1 pip install -U"
alias pip-upgrade-venv="pip freeze | cut -d'=' -f1 | xargs -n1 pip install -U"
</code></pre></div></div>

<p>You can now use the command <code class="language-plaintext highlighter-rouge">pip-upgrade</code> to upgrade all Python packages.</p>

<p>When you’re inside a virtualenv, use the command <code class="language-plaintext highlighter-rouge">pip-upgrade-venv</code> to update all packages instead.</p>

<p>Make sure to update your requirements.txt file after <code class="language-plaintext highlighter-rouge">pip-upgrade-venv</code> using <code class="language-plaintext highlighter-rouge">pip freeze &gt; requirements.txt</code>!</p>

<h2 id="the-end">The end</h2>

<p>I hope this article has saved you some time!</p>

<p>This method was very simple and didn’t require you to download someone’s weird, long script or a new Python package.</p>]]></content><author><name>Doug Beney</name></author><category term="Answers" /><category term="Python" /><summary type="html"><![CDATA[Don’t want to read and just want the solution? Click here to jump to the solution]]></summary></entry><entry><title type="html">“Could Not Connect” Airpods + Kindle Paperwhite FIX (Works with Kindle Oasis too)</title><link href="https://dougie.io/answers/airpods-kindle/" rel="alternate" type="text/html" title="“Could Not Connect” Airpods + Kindle Paperwhite FIX (Works with Kindle Oasis too)" /><published>2019-07-20T00:00:00+00:00</published><updated>2019-07-20T00:00:00+00:00</updated><id>https://dougie.io/answers/airpods-kindle</id><content type="html" xml:base="https://dougie.io/answers/airpods-kindle/"><![CDATA[<p>I just got a Kindle Paperwhite that supports Audible. At first I had no luck connecting it to bluetooth.</p>

<p>The error was something along the lines of ‘Could not connect to bluetooth device “AirPods”’.</p>

<p>The fix was simple.</p>

<ol>
  <li>Hold the power button of the kindle for 40 seconds (or until the device begins to reboot automatically).</li>
  <li>Ensure both Airpods are in its case.</li>
  <li>Open the lid of the Airpods case.</li>
  <li>Press the button on the back of the Airpods case until a light continuously flashes white.</li>
  <li>Add the bluetooth device as normal with the Kindle.</li>
</ol>

<p>It should work now!</p>]]></content><author><name>Doug Beney</name></author><category term="Answers" /><category term="Tech" /><category term="Kindle" /><category term="Reading" /><summary type="html"><![CDATA[I just got a Kindle Paperwhite that supports Audible. At first I had no luck connecting it to bluetooth.]]></summary></entry></feed>